ADPatch
Applying a
patch updates your existing system in various ways, from adding a new
feature or product to improving system performance.
patches are applied for a number of reasons, including:
■ Fixing an existing issue
■ Adding a new feature or functionality
■ Updating to a higher maintenance
level
■ Applying the latest product
enhancements
■ Providing interoperability to new
technology stacks
■ Determining the source of an issue
■ Applying online help
Depending on the type of patch, it may update the file system, or the database,
or
both.
Unified Driver File
The unified driver, named u.drv, contains the commands necessary to
change files and database objects, and to generate new objects. It contains
copy,
database, and generate portions and performs the copy, database, and generate
actions
in the stated order. You typically run the unified driver on all APPL_TOPs.
AutoPatch
runs only the actions that are required for the current APPL_TOP.
C,D and G Driver File
C – copy driver
D – database driver
G – forms and reports generation driver
Command Line Patching Utilities
You run the following utilities from the command line.
AutoPatch
AutoPatch is the utility used to apply all patches to the Oracle Applications
file system or database.
AD Merge Patch
When you apply patches individually, you must perform patching tasks multiple
times. For example, for every individual patch there may be duplicate link and
generate processes. AD Merge Patch merges multiple patches into a single patch
so
that the required patching tasks and processes are performed only once.
i.e. admrgpch -s ./source -d ./target
-merge_name merged001
AutoPatch
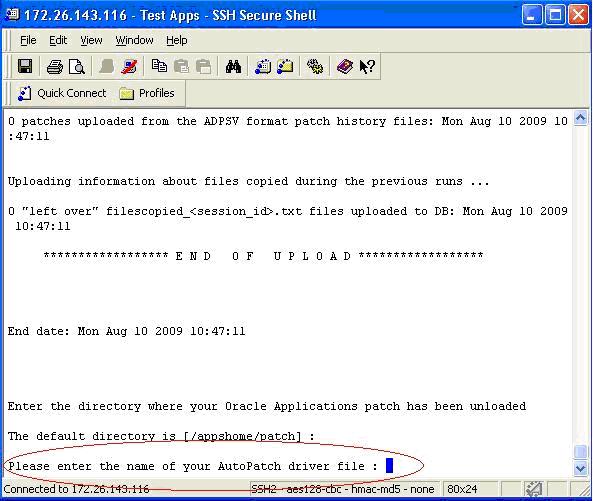
Use AutoPatch to apply patches to the Oracle Applications file system or
database. It
gathers necessary information about your system through a series of prompts.
When
you have completed the prompts, AutoPatch performs all the tasks required to
apply
the patch, including the following:
■ Reads patch metadata to determine patch dependencies and requirements.
■ Uploads patch information from a prior patch session to the database (if
needed).
■ Reads and validates the patch driver file and reads the product driver files.
■ Compares version numbers of object modules from the product libraries and
version numbers of the existing files against the patch files.
■ Backs up all existing files that will be changed by the patch.
■ Copies files.
■ Archives files in libraries.
■ Relinks executables.
■ Generates forms, reports, message, graphics, and Java archive (JAR) files.
■ Compiles JSP files and invalid database objects.
■ Updates database objects.
■ Runs AutoConfig to update configuration files, if any template files are
introduced
or updated by the patch.
■ Saves patch information to the database.
AutoPatch takes no action if a patch contains no new updates to files or
database
objects in your system. If AutoPatch detects that there is a previously failed
AutoPatch session, it will attempt to recover that session.Preparing your
System for Patching.
Before you begin a patching session, there are some important tasks you need to
complete.
Enable Maintenance Mode
Before you initiate an AutoPatch session, you should enable maintenance mode
and Shutdown concurrent manager. During a maintenance mode downtime, user login
is restricted. Users are redirected to a system downtime URL, which informs
them that the maintenance session is in progress.
To enable or disable maintenance mode, use the Change Maintenance Mode menu in
AD Administration.
Shut Down Services
If you are applying a patch that updates or relinks files, shut down the
corresponding concurrent manager, Web server listeners.
Log File Description
adpatch.log main AutoPatch log file (default name)
adpatch.lgi for AutoPatch informational messages (default name)
adrelink.log for relinking
Command Line Arguments
You can direct the way the AutoPatch operates by adding modifiers to the
AutoPatch
start command. These modifiers may be in the form of arguments or options.
$ adpatch logfile=test.log
You can enter more than one token=value argument on a single command line by
separating them with one blank space as in the following AutoPatch command.
$ adpatch printdebug=y flags=hidepw
In some cases, you can include more than one value for a token. In this case,
separatethe values with commas.
$ adpatch flags=nohidepw,trace
Comma-separated lists must not contain blank spaces. For example, this command
is
not valid:
$ adpatch flags=nohidepw, trace
The following arguments are specific to AutoPatch and can be used to modify and
refine its behavior.
AutoPatch Options
The options= argument is used to pass generic options to AutoPatch. It takes
the form
of a comma-separated list. Enter one option or a comma-separated list of
options. For
example, options=nocopyportion,nogenerateportion. Do not include a space after
the
Option Description
autoconfig Purpose: Tells AutoPatch to run AutoConfig automatically.
Default: autoconfig
Use options=noautoconfig if you are applying a number of patches in
sequence and want to run AutoConfig once, after applying the last patch of
the sequence.
Default: checkfile
Use options=nocheckfile to turn off the checkfile feature.
Default: compiledb for standard patches. nocompiledb for standard patch
translations, documentation patches, and documentation patch translations.
Use options=nocompiledb to save time when multiple non-merged patches are
applied in a maintenance window.
Default: compilejsp for standard patches. nocompilejsp for standard patch
translations, documentation patches, and documentation patch translations.
Use options=nocompilejsp to save time when multiple non-merged patches
are applied in a maintenance window.
Default: copyportion
Use options=nocopyportion to tell AutoPatch not to perform copy actions of
the driver.
Default: databaseportion
Use options=nodatabaseportion to tell AutoPatch not to perform database
actions. of the driver
Default: generateportion
Use options=nogenerateportion to tell AutoPatch not to perform generate
actions of the driver.
Default: nohotpatch
integrity Purpose: Tells AutoPatch whether to verify that the version of each
file
referenced in a copy action matches the version present in the patch.
Default: nointegrity
Comments: Using options=nointegrity is safe and avoids some AutoPatch
overhead.
Default: nophtofile
Use options=phtofile to tell AutoPatch not to upload patch history
information to the database.
Interactive or Non-interactive Patching
You can apply patches interactively or non-interactively.
Interactive patching
means that you supply basic information that AutoPatch needs by responding to a
series of prompts.
Non-interactively substantially
reduces the need for user intervention when AutoPatch processes patching tasks.
You create a defaults file that contains much of the information you would have
supplied at the AutoPatch prompts. Then, when you run AutoPatch, you specify
the name of the defaults file, the location of the patch top directory, the
name of a driver file, and other parameters on the command line.
Create the defaults file.
Start AutoPatch, using the defaultsfile= argument, and specify the file name
and the
path to the defaults file. This creates a defaults file for the current
environment.
UNIX:
The file must be under the $APPL_TOP/admin/ directory, where is
the database name (ORACLE_SID/TWO_TASK). For example:
$ adpatch defaultsfile=$APPL_TOP/admin/testdb1/adpatchdef.txt
$ adpatch defaultsfile=$APPL_TOP/admin/testdb1/def.txt logfile=1234567.log \
patchtop=$APPL_TOP/patches/1234567 driver=u1234567.drv workers=3 \
interactive=no
Restarting a Non-interactive AutoPatch
Session
When AutoPatch is running non-interactively and encounters an error, it exits
to the
operating system and reports a failure. The restart argument is intended
specifically
for this circumstance. When AutoPatch sees the restart=yes argument, it assumes
that
there is an old session, and expects to find one. If it cannot, it will fail.
Do not indicate restart=yes to start a new AutoPatch session.
Complete the following steps:
1. Look through the log files, diagnose the error, and fix it.
2. Use the same command line options that you used initially, but add
restart=yes.
UNIX:
$ adpatch defaultsfile=$APPL_TOP/admin/testdb1/def.txt logfile=1234567.log \
patchtop=$APPL_TOP/patches/1234567 driver=u1234567.drv workers=3 \
interactive=no restart=yes
Windows:
C:\> adpatch defaultsfile=%APPL_TOP%\admin\testdb1\def.txt \
logfile=1234567.log patchtop=%APPL_TOP%\patches\1234567 \
driver=u1234567.drv workers=3 interactive=no restart=yes
Abandoning a Non-interactive AutoPatch
Session
When you specify interactive=no on the AutoPatch command line, AutoPatch
expects
that there is no existing failed session. AutoPatch aborts if it finds restart
files from a failed session. Running AutoPatch with the interactive=no and
restart=yes command line arguments restarts the previously incomplete session.
To start a completely new AutoPatch session when there is an existing failed
session,
specify interactive=no and abandon=yes on the AutoPatch command line. With this
command, AutoPatch deletes the restart files and any leftover database
information
from the failed session.
Complete the following steps:
1. Verify that you do not want to restart the previous failed session.
2. Start AutoPatch with the abandon=yes option:
UNIX:
$ adpatch defaultsfile=$APPL_TOP/admin/testdb1/def.txt logfile=7654321.log \
patchtop=$APPL_TOP/patches/7654321 driver=c7654321.drv workers=3 \
interactive=no abandon=yes
Windows:
C:/> adpatch defaultsfile=%APPL_TOP%\admin\testdb1\def.txt \
logfile=7654321.log patchtop=%APPL_TOP%\patches\7654321 \
driver=c7654321.drv workers=3 interactive=no abandon=yes
/* Script to find out Patch level of
mini Pack */
Select product_version,patch_level from fnd_product_installations
where patch_level like '%FND%';
I.e.
PATCH_LEVEL
11i.FND.H
11i.AX.I
11i.AK.G
11i.XLA.H
11i.GL.J
11i.FA.O
AD Patches Tables
- AD_APPLIED_PATCHES
- AD_PATCH_DRIVERS
- AD_PATCH_RUNS
- AD_APPL_TOPS
- AD_RELEASES
- AD_FILES
- AD_FILE_VERSIONS
- AD_PATCH_RUN_BUGS
- AD_BUGS
- AD_PATCH_COMMON_ACTIONS
- AD_PATCH_RUN_BUG_ACTIONS
- ad_comprising_patches
Concurrent Manager
- FND_CONCURRENT_QUEUES
- FND_CONCURRENT_PROGRAMS
- FND_CONCURRENT_REQUESTS
- FND_CONCURRENT_PROCESSES
- FND_CONCURRENT_QUEUE_SIZE
FND
Tables
- FND_APPL_TOPS
- FND_LOGINS
- FND_USER
- FND_DM_NODES
- FND_TNS_ALIASES
- FND_NODES
- FND_RESPONSIBILITY
- FND_DATABASES
- FND_UNSUCCESSFUL_LOGINS
- FND_LANGUAGES
- FND_APPLICATION
- FND_PROFILE_OPTION_VALUES
If you want any further clarification, check below metalink documents
Patching Best Practices and Reducing
Downtime - Note:225165.1
Oracle Applications Patching FAQ -
Note:174436.1
How to Merge Patches Using admrgpch -
Note:228779.1
For the answer of the question 'How to apply patch' please visit http://oracleared.blogspot.co.uk/2012/04/adpatchhow-to-apply-patch.html
Your feedback/comment is quite important for improving this blog so feel free to leave your comments & suggestions