Wednesday, April 18, 2012

Oracle EBS11i: IC_LOTS_MST and PO_VEND_MST

EBS11i: IC_LOTS_MST and PO_VEND_MST


Today I have been asked to extract data from 'LOT/SUBLOT  Function' from OPM Inventory responsibility e.g.

I have to show Item_no, Lot, Vendor and Creation_Date where onhand quantity of that particular item must exists.
 PO_VEND_MST
IC_LOTS_MST and PO_VEND_MST

I wrote query:


select item_no,lot_no,ilm.vendor_lot_no,
       (select vendor_no
        from po_vend_mst pv
       where pv.VENDOR_ID= shipvend_id)vendor_no,
       ilm.LOT_CREATED
  from ic_item_mst iim,
       ic_loct_inv ili,
       ic_lots_mst ilm
 where iim.ITEM_ID = ili.ITEM_ID
   and iim.ITEM_ID = ilm.ITEM_ID
   and ilm.LOT_ID = ili.LOT_ID
   and ili.loct_onhand <> 0 -- 
   and iim.ITEM_NO = '15000009'


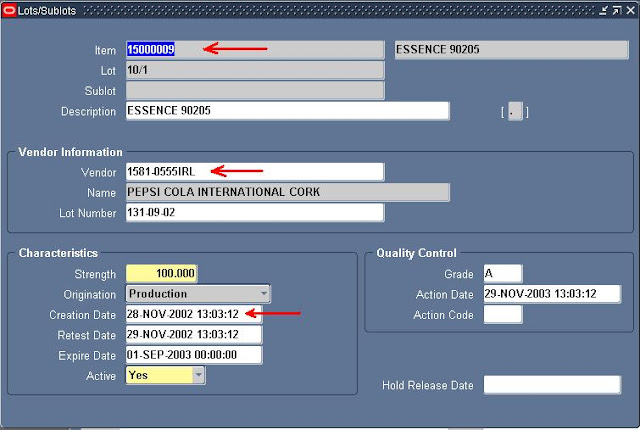
Main challenge was the vendor number actually in the following lov you can see the vendor_id (which is not from PO_VENDORS table) when I join this vendor_id with PO_VENDORS table it returns nothing. What I figured out from the LOV was that under 'Vendor' heading, vendor_id and VENDOR_SITE_CODE is concatenated and I can find out these values from PO_VENDOR_SITES_ALL but I was unable to find the table where concatenated values already exists. So I googled it and asked from other champs but no cure so I started checking value sets individually and found that this LOV is showing data from PO_VEND_MST table. So I joined the "shipvend_id" with PO_VEND_MST table and problem solved. In addition we can further join the PO_VEND_MST with PO_VENDORS.


IC_LOTS_MST
IC_LOTS_MST and PO_VEND_MST

Cheers :).

Your feedback/comment is quite important for improving this blog so feel free to leave your comments & suggestions

Friday, April 6, 2012

ORA-00600: internal error code, arguments

ORA-00600: internal error code, arguments


ORA-00600:

internal error code, arguments: [string], [string], [string], [string], [string], [string], [string], [string]
Cause:This is the generic internal error number for Oracle program exceptions. This indicates that a process has encountered an exceptional condition.
Action:Report as a bug - the first argument is the internal error number

Yesterday I was working on report in Oracle Report Builder 6i when I compiled all objects by pressing ctrl+shift+k. All objects compiled well, but when I tried to run the report it showed error  
ORA-00600: internal error code, arguments
"REP-1247: Report contains uncompiled PL/SQL.". So I opened every formula column to but when I opened below illustrated formula column it was showing error "ORA-00600: internal error code, arguments:[17269],[92714264],[],[],[],[],[],[]" as illustrated below:

ORA-00600: internal error code, arguments
To avoid this error what I did is just put the schema name before the table of which table is belong to and again compile the formula column and it compiled successfully as illustrated below. 

ORA-00600: internal error code, arguments

We can check the ownership of the table by describing table as below or in TOAD just write down the table name and press F4:
ORA-00600: internal error code, arguments

By doing this a window will appeared and you can see the table name prefixed by owner schema on the title bar of the window as illustrated below:
ORA-00600: internal error code, arguments
Or you can check the ownership of then table by query:
select *
  from dba_objects
 where object_name = 'PO_REQUISITION_LINES_ALL'
   and object_type = 'TABLE'

as illustrated below:

ora 600 error
ORA 600 ERROR

An other way to find the ownership is illustrated below:
Click on 'Schema Browser' button then on 'TABLE' tab then click on 'FILTER' button now mentioned table name and check the checkbox of 'Check in all Schemas' because we don't know of which schema this table is belongs to and then press 'OK'  button:
ORA 600 error
ORA 600 ERROR

By this you can see the ownership as illustrated below:
ORA 600 error
ORA 600 ERROR
All the best :).

Your feedback/comment is quite important for improving this blog so feel free to leave your comments & suggestions

Wednesday, April 4, 2012

VNCserver graphics problem [Solved]

VNCserver graphics problem [Solved]


1- Kill exsisting session of vnc
   vncserver -kill :<port>

2- vi .vnc/xstartup
--Follow the following convention uncomment lines having *
-- Here * is used for highlighting purpose.
#!/bin/sh
# Uncomment the following two lines for normal desktop:
* unset SESSION_MANAGER
* exec /etc/X11/xinit/xinitrc
[ -x /etc/vnc/xstartup ] && exec /etc/vnc/xstartup
[ -r $HOME/.Xresources ] && xrdb $HOME/.Xresources
* xsetroot -solid grey
* vncconfig -iconic &
* xterm -geometry 80x24+10+10 -ls -title "$VNCDESKTOP Desktop" &
#twm &

3- Start a new vnc session
     vncserver


Your feedback/comment is quite important for improving this blog so feel free to leave your comments & suggestions

Monday, April 2, 2012

ADPATCH how to apply patch

How to apply a Patch?


Step 1 -Download the patch from metalink.
It is better to check the table 'AD_BUGS' if the patch is already applied then no need to apply again.
you can check list of applied patches as follows:


select
  from ad_bugs 
where bug_number = 'patch_number';


if this query returns any row then it means this patch is already applied.
to see the difference between 'AD_BUGS' and 'AD_APPLIED_PATCHES' please visit.
http://oracleared.blogspot.co.uk/2012/03/oracle-difference-between-adbugs-and.html
Oracle Patch
Oracle Patch Step by Step Guide


Step 2 -Check all Per-requisites from read me file. First apply all the patche(s) which are listed in pre-requisites (if any) and then apply the required patch and if there is/are any patch suggested in post-requisite then apply those too.
Oracle Patch Step by Step Guide


Step -3 Check successful patch completion condition from read me file.
Oracle Patch
Oracle Patch Step by Step Guide

(If successful patch condition already meets then no need to apply the patch.)

Step -4 Upload the patch in patch directory (i.e /appshome/patch) in zip format
Extract the patch through following
unzip <file name>
Step -5 Down the application services of concerned instance. Or do exactly what else is written in "Pre-requisite" if any.
Step -6 Run .env file of concerned instance. (Optional)
e.g (/appshome/appsuat1/UAT1/apps/apps_st/appl/APPSUA T1_erpappdev.env)
Step -7 Go to the directory /appshome/patch (i.e cd /appshome/patch)
  
Step -8 Enter the command adadmin, following command lines will appear after adadmin.
Oracle Patch
Oracle Patch Step by Step Guide
                                                                 

(Press ENTER for default value )

Oracle Patch
     
(Enter the log file name with extension .log or Press Enter for default value)
Oracle Patch
Oracle Patch Step by Step Guide

(Press ENTER for default value)
Oracle Patch
Oracle Patch Step by Step Guide

(Press ENTER for default value)

Oracle Patch
Oracle Patch Step by Step Guide

(Press ENTER for default value)
Oracle Patch
Oracle Patch Step by Step Guide

(Enter the system password usually its password is 'manager')
Oracle Patch
Oracle Patch Step by Step Guide

(Enter the SYSTEM Password or Press ENTER for DEFAULT)
Oracle Patch
Oracle Patch Step by Step Guide

 Enter 5 as your choice (Change Maintenance Mode)
Oracle Patch
Oracle Patch Step by Step Guide


Enter 1 as your choice (Enable Maintenance Mode)
Enter 3 as your choice (Return to main menu)

Oracle Patch
Oracle Patch Step by Step Guide
     
Enter 6 as your choice (Exit adadmin area)


     Step -9 Enter the command adpacth
Oracle Patch
Oracle Patch Step by Step Guide

(Press ENTER for default value)

oracle security patches

 (Enter the adpatch log file name with extension .log)
oracle security patches

(Press ENTER for default value)
oracle security patches

 (Press Enter for default batch size)
oracle critical patch update

 (Enter the SYSTEM Password)
oracle critical patch update

 (Enter the apps password)
oracle critical patch update

 (Select or enter your directory where patch is placed)
oracle critical patch update

(Enter the driver file name placed in patch directory with .drv extension)
* Auto patch process will start now, follow the following steps after completion of auto patch.

Step -10 Enter the adadmin command again to disable maintenance mode.
                Repeat complete Step 8 and follow the following screen
oracle critical patch update


Step -11 Bounce the services of DB.

Step -12 Up the application services.

All the best :)

For complete study of ADPATCH please visit http://oracleared.blogspot.co.uk/2012/03/oracle-ad-patch.html 

Your feedback/comment is quite important for improving this blog so feel free to leave your comments & suggestions